

ここまで【twenty seventeen】にカスタマイズを加えてきました。しかしトップページにずらずらずらずらと記事が表示されてしまい、これだとスマートフォンで閲覧した時に記事を見つけにくくなってしまいます。
そこで、トップページ「index.php」とアーカイブ「archive.php」に変更を加えて、ページをスマートに表示してみることとする。
訪問者の方がトップページを見た時、1画面で多くの記事の概要が分かるようになるんですかね。記事の内容はそこでクリックして見てもらえば良いじゃないですか。
この作業もそれ程、難しくないのでご安心ください。
一覧表示にし「...続きを読む」に変更するには
やることは2つあります。
- WordPressでデフォルトでインストールされているプラグイン「WP Multibyte Patch」を有効化する
- 一覧表示するために「index.php」と「archive.php」のコード変更を行う
たったこれだけです。それでは順に説明します。
「WP Multibyte Patch」を有効化する
WordPressのメニューより「プラグイン」-「インストール済みプラグイン」を開きますと「WP Multibyte Patch」があります。もし「有効化」となっている場合にはクリックして有効化してください。有効になっている場合は「停止」と表示されています。
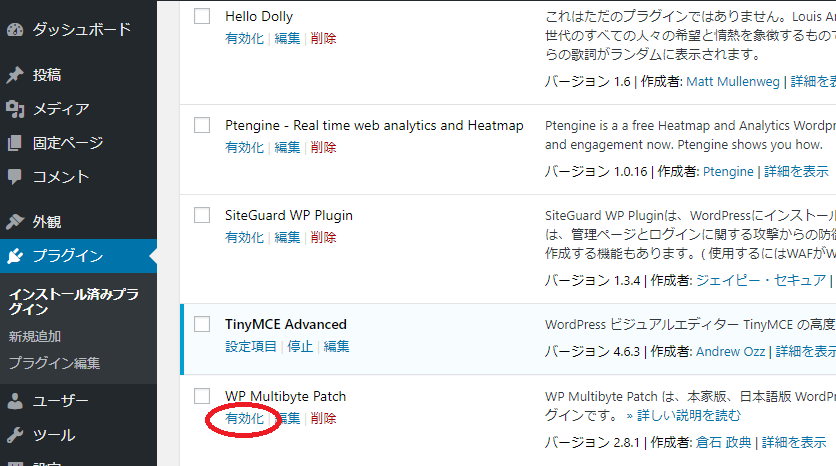
「編集」という箇所もありますが、筆者には良く分からなかったので、とりあえず何も編集はしませんでした。
メインインデックスのテンプレート「index.php」に変更を加える
「index.php」の13行目を探してください。
<main id="main" class="site-main" role="main">
    <?php
    if ( have_posts() ) :

        /* Start the Loop */
        while ( have_posts() ) : the_post();

            /*
             * Include the Post-Format-specific template for the content.
             * If you want to override this in a child theme, then include a file
             * called content-___.php (where ___ is the Post Format name) and that will be used instead.
            */
            get_template_part( 'template-parts/post/content', get_post_format() );

        endwhile;

        the_posts_pagination( array(
            'prev_text' => twentyseventeen_get_svg( array( 'icon' => 'arrow-left' ) ) . '<span class="screen-reader-text">' . __( 'Previous page', 'twentyseventeen' ) . '</span>',
            'next_text' => '<span class="screen-reader-text">' . __( 'Next page', 'twentyseventeen' ) . '</span>' . twentyseventeen_get_svg( array( 'icon' => 'arrow-right' ) ),
            'before_page_number' => '<span class="meta-nav screen-reader-text">' . __( 'Page', 'twentyseventeen' ) . ' </span>',
        ) );

    else :

        get_template_part( 'template-parts/post/content', 'none' );

    endif;
    ?>

</main><!-- #main -->
>
「get_template_part( 'template-parts/post/content', get_post_format() );」この部分になるのですが。ここの「get_post_format()」を「'excerpt'」と変更してください。変更後が下のようになります。8行目の「excerpt」が変更点です。
        while ( have_posts() ) : the_post();

            /*
             * Include the Post-Format-specific template for the content.
             * If you want to override this in a child theme, then include a file
             * called content-___.php (where ___ is the Post Format name) and that will be used instead.
            */
            get_template_part( 'template-parts/post/content', 'excerpt' );

        endwhile;
同様にアーカイブも変更します。
アーカイブ「archive.php」にも同じように変更を加える
「index.php」同様に15行目を探してください。
<div id="primary" class="content-area">
    <main id="main" class="site-main" role="main">

    <?php
    if ( have_posts() ) : ?>
        <?php
        /* Start the Loop */
        while ( have_posts() ) : the_post();

            /*
             * Include the Post-Format-specific template for the content.
             * If you want to override this in a child theme, then include a file
             * called content-___.php (where ___ is the Post Format name) and that will be used instead.
             */
             get_template_part( 'template-parts/post/content', get_post_format() );

        endwhile;

        the_posts_pagination( array(
もうお分かりですね。
「get_template_part( 'template-parts/post/content', get_post_format() );」の「get_post_format()」を「'excerpt'」に変更してください。これで完了です。
これで一通りの修正は完了したので、実際に参照してみましょう。タイトルとアイキャッチ画像と100文字程度の文章が表示され「...続きを読む」となっていませんか?思ったように変更されていたらOKです。
実は’excerpt’と変更すると利用される部品が変更されますので注意です
親テーマを使用している前提で説明しますと、「twentyseventeen\template-parts\post\content-excerpt.php」が利用されます。本来なら同フォルダの「content.php」が利用されるのですが、パラメータの変更により呼ばれるパーツが変更されます。
思い出してください。今まで子テーマにコピーして「content.php」って修正を加えませんでしたか?
もし修正をくわえている方がいましたら、同様の修正が必要になるケースがあります。その場合はこの「content-excerpt.php」ファイルを子テーマである「twentyseventeen-child/template-parts/post/」へコピーし修正を加えて下さい。
筆者は修正を加えていたので「content-excerpt.php」を同じように修正しました。修正した箇所は「WordPress【twenty seventeen】のトップページに表示される記事のタイトルを「見出し2(h2)」に変更する方法」の記事に記載してありますのでご参照ください。
これでスマーフォンでも見易くなったのかな?
【A8.netに登録しよう!】
◇ 広告主数・アフィリエイトサービス数日本最大級☆
◇ 登録はもちろん無料、審査なしのアフィリエイトサービス☆
◇ 使いやすいサイトNO.1
⇒アフィリエイトならA8.net

ブログを始めたばかりのものです。スマホのトップ画面に記事一覧を出したくて、一番シンプルな方法を書かれていたももやんさんの投稿を参考にさせていただきましたが、うまくいきません。
行ったことは、
・親テーマの「index.php」と「archive.php」のコード変更
・「content-excerpt.php」の子テーマへのコピーとh3→h2変更
ここまでで変わらなかったので、親テーマでコード変更した「index.php」と「archive.php」をそのまま子テーマにコピーしました。
これでも変わりませんでした。何が間違っているかご指摘いただければ幸いです。
よろしくお願いいたします。
私のサイトを参考にして頂きありがとうございます。
ブログ始めたばかりと言うことでwordpressのカスタマイズにご苦労されているようですね。
テーマはtwenty seventeenを前提にアドバイスさせて頂きます。メニュー▶︎設定▶︎表示設定のトップページが「最新の投稿」ではなく「固定ページ」となっているようなことはないでしょうか?
もしトップページが固定ページとなっている場合にはindex.phpに修正を加えても変更されません。
まずはそこが正しいかを確認してみて下さい。
最初は戸惑う事が多いかもしれませんが、良いブログを作れるようにお互い頑張りましょう!
ありがとうございます。やってみます。
こんにちは
上記のように修正したのですが、100字の文章が表示されるのですが、アイキャッチは表示されません。どのように対処したら良いでしょうか
こんにちは。kekekeさん。
使用しているテーマによっても変わってきますが、下記の記事も参考にしてみてください。
http://digital-life.club/hp/wordpress/twenty-seventeen%ef%bd%b0i%ef%bd%b0image%ef%bd%b0position
もしかしたら何か記述が足りないことも考えられますので。
先に投稿のあるKekekeさんと同じように、100文字は表示されますが、アイキャッチが表示されません。記載のある内容を全て確認したつもりですが上手くいかず行き詰ってます。つい数週間前にWPをインストールしたので、テーマコードを含め何か新しくなったりしてませんよね。ももやんさんの投稿が解り易く勉強になるので、全投稿(twenty seventeen)を試してみたいと思ってます。この件、何とかクリアしたいので、ご教授いただければ幸いです。